

Development Guide
Creating effective qdex modules
“How are students going to use qdex in my course?”
1. Establish Use Cases
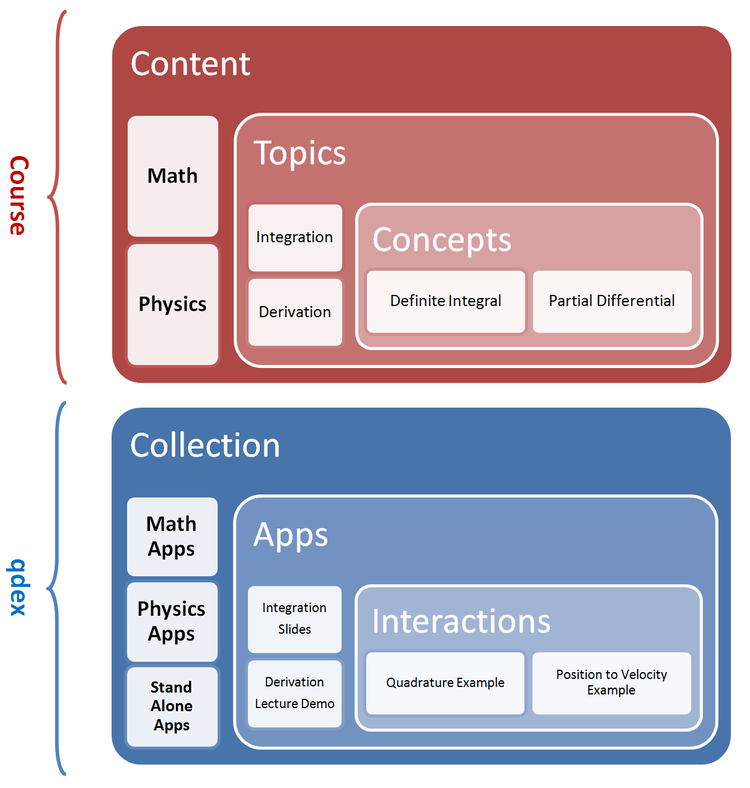
The qdex framework can be used to add unique interactive experiences to almost any academic scenario. To that end, the first question that needs to be addressed when starting down the path of creating qdex modules is how you see your modules fitting into your particular course. Several of the more common scenarios where qdex modules can be used are outlined below.


“What modules do I need to create?”
2. Outline Core Concepts
The second stage in developing custom modules for a course is to identify the key topics and concepts in a course that would benefit from a mobile, interactive experience. This is a critical stage in development, because it frames the scope of the development effort required.
This is also a critical step because the qdex team recommends that to take full advantage of the framework, a fully interactive and "experiential" component should be developed for each concept. These concepts can then be expanded out to form modules, and eventually the collections of modules that make up a complete course offering.
“What is the best way to convey this concept?”
3. Storyboard Interactive Components
Once you have segmented your course into the core concepts that require interactive app components, your next step is to storyboard the interactions to layout the experience for your students. Your storyboards can scale in complexity from simple hand drawings, through to detailed renderings and user experience stories. The general idea is that you want to decide what you would like your student to experience, and how their interactions will lead to a better understanding of the concept.
It is important that you do not limit the complexity of the experience you would like your students to have at this stage. You should let your creativity run wild and imagine the best experience for your students, and then leave the logistics to the development stage.

“How do I build this concept in qdex?”
4. Develop Interactive Components
The next step after you have broken down your course into the key concepts, and created storyboards for the interactive component that you plan to create for each, is to dive in and create the components. You can build your interaction from scratch using the Knowledge Base, or customize one of the qdex-approved assets.


“Am I painting a complete picture?”
5. Develop Core Content
Once you've created the interactive components that illustrate your key learning outcomes, the last step of the development process is to include any requisite background material, check-your-understanding questions, multimedia, etc. This is the core content that ensures that your students are primed for the interactions in your module, and that the concepts that are illustrated are retained.
“How can the module be improved?”
6. Module Review
The design review stage is one of the most important stages of module development. The review process is your chance to validate your ideas and designs to confirm that they appear valid before the module reaches your students. We would recommend consulting with a diverse group of critics including:
Students • Colleagues • qdex • Designers • Pedagogues
From our experiences developing a wide range of modules and interactions, we have compiled a collection of Dos and Don'ts that may help you create clean, concise and effective modules.
